#Image to Pixel Notepad
Explore tagged Tumblr posts
Visit Tumblr Blog
Explore Tumblr blogs with no restrictions, modern design and the best experience.
Last Seen Tumblr Blogs


Fun Fact
Tumblr was attacked by a cross-site scripting worm deployed by the Internet troll group GNAA on Dec 3, 2012.
Text

How to Convert Any Jpeg Gif Png Tiff Image to Notepad Plus or Pixcel Notepad using Bulk Text Encryptor Software | INTELLITECH DATA-SERVICES 7428811442
#imagetotextconversion#notepadplus#pixcel#.wrt#autotyper#pixcelnotepad#.nts#imagetowrt#imagetonotepadplus#imagetonts#image to StartTxt#Image to Pixel Notepad#Image to Pixcel Notepad#Data Entry Image to Notepad#Jpeg to wrt#jpg to wrt#jpg to nts#jpeg to nts#image conversion
0 notes
Text
========================================================
[tutorial: build your own neocities/nekoweb page]
========================================================
a beginner's guide for making your very own home on the indie web—retro, personal, weird, and 100% yours.
this ain’t an average wix, squarespace, or tiktok aesthetic.
we’re talking full html/css with soul and attitude.
[ prerequisites ]
------------------
> an idea
> basic text editor (vscode, notepad++, or even notepad)
> account on https://neocities.org or https://nekoweb.org
> some gifs or tiles you love (dig deep or make your own)
> optional: image host or gif repo (or self-host everything)
[ feeling overwhelmed? read this. ]
-----------------------------------
you do *not* need to know everything.
html is not a mountain. it's a garden.
you plant one tag. then another. then a style. then a button.
you can build your site piece by piece.
and every piece is a portal to somewhere personal.
you are allowed to make broken pages.
you are allowed to use templates.
you are allowed to start over as many times as you want.
this is *your* world. you control the weird.
[ step 1: create an account ]
-----------------------------
> neocities: https://neocities.org
> nekoweb: https://nekoweb.org
register a name, log in, and enter your file manager.
this is where you upload your files and see your site live.
[ step 2: your first file - index.html ]
----------------------------------------
make a new file: `index.html`
basic starter:
<html>
<head>
<title>my weird little corner</title>
<link rel="stylesheet" href="style.css">
</head>
<body>
<h1>welcome to the void</h1>
<p>this is my page. it’s strange. like me.</p>
<img src="mygif.gif">
</body>
</html>
> upload to the dashboard
> boom. you’re live at
https://yoursite.neocities.org
or https://nekoweb.org/u/yoursite
[ step 3: add a style sheet - style.css ]
-----------------------------------------
create a file called `style.css` and upload it.
here’s some nostalgic magic:
body {
background: url('tile.gif');
color: lime;
font-family: "Courier New", monospace;
text-shadow: 1px 1px 0 black;
}
img {
image-rendering: pixelated;
}
marquee {
font-size: 20px;
color: magenta;
}
link it in your html and the vibes activate.
[ step 4: decorate it like a haunted usb ]
------------------------------------------
> use <marquee> for chaos scrolls
> embed gifs from https://gifcities.org/
> steal buttons from https://cyber.dabamos.de/88x31/
> set up a guestbook at https://www.smartgb.com/
> loop audio with <audio autoplay loop>
> add fake errors, 90s web lore, random link lists
[ step 5: resources, themes, and comfort ]
------------------------------------------
> templates & layouts: https://numbpilled-themes.tumblr.com
> glitchy gifs & buttons: https://glitchcat.neocities.org/resources
> layout builder: https://sadgrl.online/projects/layout-builder/
> free tiled backgrounds: https://backgrounds.neocities.org/
> beginner html intro: https://www.w3schools.com/html/
> pixel fonts & cyber assets: https://fontstruct.com/
remember:
you don't need to know js. you don't need to be a coder.
you just need a mood, a direction, a dream.
the html will follow.
[ bonus concept: shrine pages ]
-------------------------------
> a page just for one character you love
> a room to house digital fragments of your identity
> embed quotes, music, images like altars
> call it shrine.html and link it from your homepage
[ closing mantra ]
------------------
you are not here to be optimized.
you are not a brand.
you are a ghost inside the machine,
carving your initials into the silicon void.
welcome to Your website.
========================================================
#webcore#old web graphics#neocities#web graphics#carrd graphics#carrd resources#rentry decor#rentry graphics#carrd moodboard#carrd inspo#neopets#indie#indie web#early web#webdevelopment#web development#web resources#web design#old internet#old web#oldweb#nekoweb#transparent gif#tiny pixels#pixel gif#moodboard#tutorial#html page#html theme#htmlcoding
435 notes
·
View notes
Text
Worth His Weight In Gold!
The Buggy figure I was grumbling about in the previous post, this is it. He is thick and can likely be utilized as an effective weapon to strike someone with, LOL!! 😸

This was the last of the official large Buggy figures that the continuously growing collection was lacking. Even came with that new figure smell, as he was sealed in the original box still.

These stickers are adorable and were love at first sight; pixel Buggy is the best!! ☺️ Just like the chocolate tin, they were an accidental find.

Not going to knowingly lie, this whole lot was purchased just for the mugi mugi stickers! 😅 While two items in the lot are at present in the collection, the rest were not. It certainly was a win for me!! 😺

Wait, why is Bon Clay there?! Truth be told, they're my second favorite One Piece character. 💙 Occasional I may come across lots with a Buggy item not in the collection yet. These lots may contain something of Bon Clay too! If that's the case, the item is kept. 😸
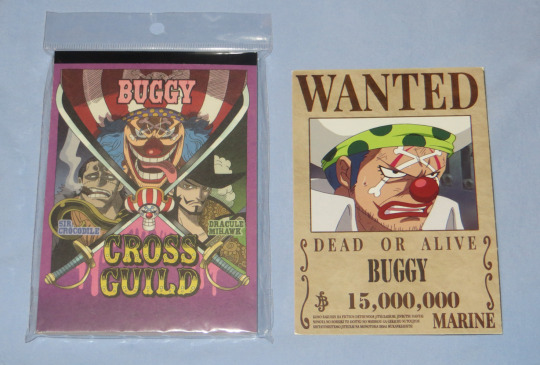
Not sure if the notepad will ever be taken out of the plastic?! As for the wanted poster, it's presumably fan made. Nevertheless, the image they used is extremely drool worthy. 🤤

My forgetful brain, forgot that the card on the left was already in the collection. *whoops* The flashy card on the right, I've only seen a couple of times. The first, it was in a huge expensive lot. 😑

The art of Buggy here makes me drool! 🤤 Heck, when doesn't the man make me drool?! Wish Alvida wasn't obstructing the gorgeous view.
#collectibles#collection#my pocketbook weeps#one piece buggy#buggy the clown#captain buggy#one piece#that which i have obtained#card collecting
20 notes
·
View notes
Note
i demand the 3D objects thoughts
Well I put it off to the absolute last possible moment. If you're reading this it's already too late. Paint 3d is dead

You will not be able to download it from the Microsoft store, and let's be honest, it's too shit for anyone to actually archive it (not that I'd even know how given it's a uwp distributed through the store and never offered as a standalone exe)
But let's not dance on paint 3d's untimely grave. As the world's first ever Kafkaesque photo editor it gave something very special to us all. I've come to love it, even if every time I use it I feel a deep and unending desire to become the joker. So let us Eulogize this beautiful mix failed start of a future we were promised but was failed to be born. Let's pour one out for Paint 3d, and explain once and for all what it really means to paint 3d.
What is paint 3d?
Before you can understand Paint 3d, you must first understand ms paint. Microsoft paint, often just referred to as "Paint" is one of the oldest standard programs to come with any windows installation. It's a bitmap editor that was begun long before most tiktok users were even born. It holds a special place in a lot of 90s and 00s kid's hearts for two reasons.
without fail, it will be installed on every windows machine. You will always have paint. It's dependable, fast, easy to get into, and will open corrupted or mislabeled images. It's the notepad of images, quick, dirty and gets the job done. You can copy and paste screenshots into there to quickly crop them
It's a little bit shit. It doesn't support transparency (well it does now but lets not get ahead of ourselves) so if you tried to make a minecraft skin with it you'd get all these solid color blobs. It doesn't support layers, so anything made on it is going to have a level of earnest shittyness to it. Text can't be rotated, bounding boxes have to be predefined shapes, and once something is on the page it's on the fucking page. MS. Paint will put pixels on the page for you, but after that point it won't hold your hand.
Point 2 is really a larger part of how ms. Paint is remembered. Ms. Paint is synonymous with youth, it's synonymous with limited computer time, with ignorance, with having nothing better. The spectacle of doing anything in Ms. Paint lead to the selling point of ms paint adventures which became homestuck. If you want to strawman someone's political opinions, you draw them in MS paint. The early, edgy, ugly look of the 00s web was defined by MS paint just as much as it was defined by adobe flash. The limitations of this piece of shit software defined a generation's artistic identity. We love it because it is shit. We would not have it any other way
Okay but you didn't explain Paint 3d!
Well, gosh, don't interrupt me. Yeah, so what is paint 3d? In 2017 Paint was added to the deprecated feature list. A special update was pushed so if you opened up paint it would ask you if you'd rather switch to paint 3d
Paint 3d put a fresh new stab at the utility, redoing it in the new UWP format and dressing it up in the company's then standard design language. The refresh also added a whole host of nice, modern features such as:

An updated set of tools, some but not all of which are pressure sensitive when used with tablets/touch

The ability to use transparency!
Hurray those are great new features wait what do those other buttons do?

Yes paint 3d lives up to it's name, you can add stock 3d models to any of your drawings and they're all kinda awful

3d text, 3d models, go ahead and place them in your scene. They put the whole project spark asset library in there last year, if you can think of it it's probably not in there but hey there'll be something and it may or may not have a texture because the model may have been intended for 3d printing
You can manipulate these objects with a slick interface that's completely non industry standard but hey it at least looks nice.

Models can also be painted on and you can pick from these options to decide the albedo/metalic values. No I don't know how to set the custom values, sometimes it's there and if you click off it's gone forever. Good luck


Oh and also when you're painting you're given a very convenient gizmo to rotate the object that isn't available in normal mode. You can multi select objects and group them together but beware it doesn't always work and using the undo key sometimes spawns a new copy at the wrong position and scale but don't worry this is a small bug in a new program and certainly won't be present in the final version on November 4th I promise.

You can put stickers on models and there's a nice little UI to stamp it if you want to put multiple here are all the stock standard stickers
You can also use these pretty tiling textures

Or you can add any png from your hardrive

Those are the only options you'll ever get or need. You can also spawn arbitrary shapes, like cubes and spheres

And in a post launch update they even added the fucking TUBE BRUSH

Look how many tube there is. So many tube You can also edit the points individually after they're created but each tube has a maximum number of points that it can contain and you have no way of knowing until it's too late.
You can also use the 3d doodle to make a shitty potato looking thing, but if you browse the #paint3d tag you'll see a lot of people more talented than me using that tool to it's fullest

As you saw you also have the option to round or point the corners.

At any point you can click the 3d view button and suddenly you're no longer head on, you can orbit the camera and view the scene from any angle. Is it actually good to work with 3d scenes in this program? God fucking no

This scene nearly killed my computer to make, and that thing had okay specs for the time. Placing objects with the non standard (but touch friendly) controls is a pain and the camera cannot be oriented in any meaningful way. There is no frecam, there is no camera scale, you can orbit, you can pan. If you want more go learn blender.
You can also change the time of day

Go ahead, rotate the sun or change the filter, some of them are even minecraft specific. Most of them are objectively worse than the default, but hey you get a lot of options
Okay yes these are all cool features, but I've been dancing around paint 3d's one actually cool feature, the one that drives me mad... because it's a good idea
great even...
...too bad it's shackled to this program.
Oh this? This? yeah we can fuck with this. Now we're fucking talking

Now I can move my objects around in 3d, scale them, reorent them and make all kind of cool 3d compositions out of cut out pieces of my 2d artwork. If you look at any cool marketing material this is by far the feature they're most proud of
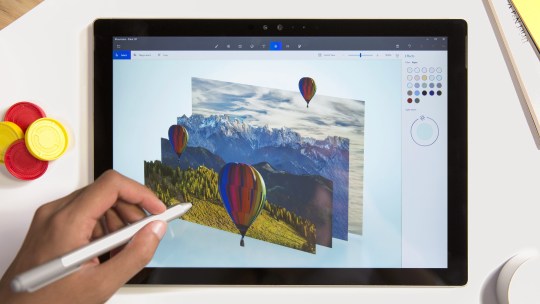
The possibilities are endless... unfortunately they're also frustrating.
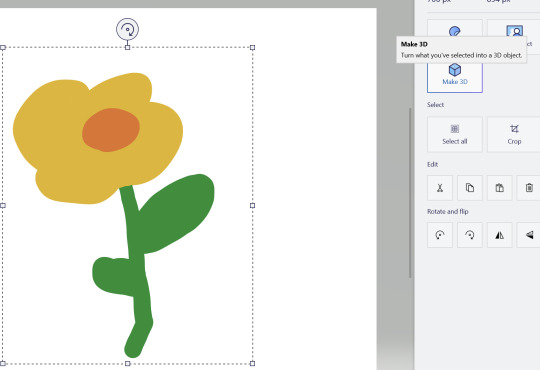
See that flower I made has a white background, and there's no magic eraser so I'd need to manually cut it out with the eraser... or use magic select

If you're in a video call while this UI is active and you're sharing your screen it will only show the gif and not the program itsself
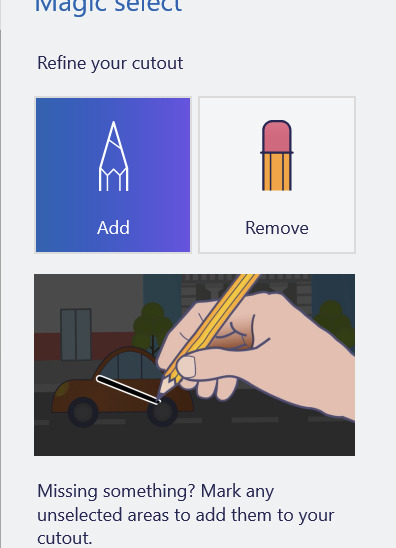

With the add and subtract tools you can provide hints about what should and should not be included. That's fine for something as simple as this drawn with a pen tool, but... well if you like to draw with the pencil? Get ready for pain buckeraroo. You can't manually slice out what you want, you just have to get the AI to guess and it will never guess perfectly. Part of your bat will be left behind on the canvas or it'll start picking up a few extra white pixels
but hey, it's 3d now, sometimes it works. You can choose to content aware fill whatever was behind on the canvas, or leave a weird white empty space behind

But now I have a field of flowers I can move however I like, okay but I think I want to add an extra leaf to one of them
Get fucked. Idiot. Once you cut it out, it's like paper. These 3d canvasses can never be grown, only shrunk and only by the eraser tool which carves in a perfect circle like a bull in a china shop. Now, it's actually very cool how you can recursively create new 3d canvasses out of existing ones, and I'm sure you could do cool stuff but any time the canvas shrinks that's as big as it'll ever be it can never grow
Also, yeah you can't just make a canvas in place, you either have to reserve space on your main canvas or clip it off of a second canvas you make earlier and just... I don't know stash it off to the side out of frame? this is how you use layers and if you want to re-order them put them in literal 3d space? Want to hide a layer? Put it behind your canvas.
This is what experts are calling: "technically a workflow, I guess"
This would be a really cool feature, unfortunately it's just not finished. It's missing that extra 20% that would make it at home in real software versus just a toy. Just like paint you have to sort of plan ahead and make all of your layers. In order... but in reverse bob ross order. See you need to make all of your foregrounds first, then and only then can you start working on your background canvas, and should you ever change your mind and want another foreground you must destroy a space of your background to create it. Oh, also, once it's 3d it can never be re-projected back into 2d... well you can turn it into a sticker, which kicks ass, but that will be flattened, if you wanted to retain the 3d rotation of it too bad. Also, making something into a sticker physically consumes it, so you'll need to copy and paste it first just in case otherwise it's gone forever
oh yeah and sometimes copy and pasting doesn't work, creates extra clones, or places them at the wrong space.
Okay let's save our work

You can actually save it as a project folder. You heard me right, folder. Paint 3d stores projects as individual folders

And they're all just called checkpoint, there's no association with like, which project each one is

And they're all full of undocumented binary files, with the exception of a png thumbnail at the very bottom.
So uhhh, why? You can't send project files to other people, at least not easilly. Is this some library that I don't know about? This all boggles my mind. I mean a .docx file is just a renamed zip file was it too much to ask to make these all renamed zips? Why would you leave it half finished like that and just not make a "new" file type?
Okay sorry I got lost in the weeds. Also I hit the image limit for this post so you're just gonna have to bear with me and use your imagination. You can do this I believe in you.
You can export as a .glb file that goes to your 3d objects folder (put a pin in that), or you can export it as a video/gif. There are few pre-canned animations like bobbing back and forth or rotating on a turntable. They can be sped up or slowed down, but that's about it.
Okay but why 3d?
God damnit I'm going to need more images for this so I'm gonna post this as is and hope I can add more photos on the reblog...
8 notes
·
View notes
Text
It's that time of year again, art summary!
...But, I haven't really drawn that much this year. So instead I'm gonna pick some highlights in chronological order, say a few things about them, and move on with my day!

Febuary 2024: This is the first frame of a katfl animatic/pmv set to "Come Along" by Cosmo Sheldrake that I started in early? mid? Febuary and am still working on, on and off! (haven't touched it in a while though) Below is a 3D Paint thing I made as a reference image for one of the scenes, I didn't need to do any of that, but I did!


April 2024: an edit of Elfilis as a mewtwo for a poképark au that also hasn't been looked at in a while! yeah, that's kinda a running theme with my projects

June 2024: Meta Knight and the years long, ever-growing to-do list that he keeps on one, singular notepad. Inspired by this post! Whole comic took me about month or so to finish on and off, and is represented here as Galacta in the Peter Griffin death pose (or my best attempt at it at least) after getting his ass handed to him by Meta
July 2024: A small pixel art "patchwork" shiny rattata that I drew for a "draw the pokemon of the day, everyday" challenge that I started on Pokefarm Q (and haven't really continued since...whoops?), who I've since named Claire because I just so happened to be watching a Snapcube clip when I hatched my first pokemon of the day shiny! thus finally freeing me from part of my quest to do every kind of rare pokemon hunt on this site
August 2024: an edit of Ripple Queen as a Dianbee (diance + ribombee..fusion? hybrid?) for the same poképark au mentioned earlier. Here she has a possessed (far left), and normal/ un/non-possessed form (middle). The possessed from has bits of a necrozma (which is what Zero is in this au) in the design at the end of her pony tails and the triangle on her forehead/gem

November/December 2024: Watcher Dee! perfect for a new years waddle dee day! I don't know or understand what came over me when I made this, but it looks cool? I guess?
Happy new year! 🎆🎆🎆
2 notes
·
View notes
Text
Tools have always worked wonders when it comes to simplifying CSS-design and development related jobs. It is interesting to note that a huge majority of web designers and developers are excited about different CSS tools that allow them to create fully functional and completely optimized websites and web apps faster. When it comes to executing some repetitive CSS tasks, nothing works better than these truly commendable CSS tools. In this post, for you, I've collected a set of 25+ CSS tools that will aid you in building a fantastic website via leveraging CSS features to the fullest. So, let's get going! Normalize.css As a contemporary, HTML5 ready alternative to CSS resets, Normalize.css allows the browsers to provide different elements which are in line with the modern web design standards. Targeting only the styles that need to be normalized, Normalize.css correct a range of common browser inconsistencies and comes with the well-commented code for easy use by future designers CSS Type Set As a remarkable typography tool for designers and developers, CSS Type Set allows you to interactively test and learn the way in which the web content can be styled. Within the 'Enter Text' text-area, you're required to enter the text that you want to modify and you'll be able to view the CSS for the same in the adjacent text-area named 'View CSS'. SpritePad SpritePad is yet another CSS tool which allows you to create CSS sprites. All you need to do is simply drag and drop images into the grid and you'll be able to receive the same in the form of a PNG sprite+CSS code. The greatest advantages of SpritePad is that you don't need to assign the CSS styles manually and there's no need to fiddle in Adobe Photoshop. Conditional-CSS Conditional-CSS is a remarkable CSS Tool which allows you to write maintainable CSS using conditional logic for targeting certain CSS statements. This is being done for both, individual browsers as well as groups of browsers. With Conditional-CSS- a free and open source CSS tool, you can conveniently optimize your CSS, streamline the maintenance of your CSS files and avail the flexibility of automatic expansion and inclusion of @import statements. PxtoEM PXtoEM is a brilliant CSS tool which makes px to em conversions simple and faster. To get started with the tool, all you need to do is simply type a base font size in pixels and PxtoEM will create a pixel to em conversion table. This will make it convenient for you to produce elastic web designs conveniently. Templatr If you aren't familiar with the concepts of HTML or CSS and want to build a fabulous website, then Templatr is the tool for you. With a wide range of layouts to choose from, you are free to upload images and a plenthora of graphic elements. All the layouts that you create using Templatr can be quickly downloaded and installed using a specific application. One of the major advantages of Templatr is that it has been translated into multiple languages. CSScomb You can go ahead with automatic sorting of your CSS properties with the CSScomb tool. The best thing about the CSScomb tool is that it can be effectively used with a wide majority of popular text editors including Notepad++ or Coda. Serving as an efficient means of beautifying your code, CSScomb is quite easy to install and configure. You can easily try CSScomb online by simply copy-pasting your code in the provided box and viewing the combed code in the adjacent box. Prefixr Prefixr is yet another interesting tool that allows you to add vendor prefixes in addition to making the stylesheet code cross-browser compatible. Prefixr will allow you to do away with all your CSS3 prefixes and instead, you'll be left with a stylesheet that uses the official syntax. That means, you aren't required to remember any specific CSS3 property simply because Prefixr has all this information built within its program. PSD2CSS Online PSD2CSS Online is a high-end CSS tool which will generate web pages from your Photoshop designs.
You are free to choose from a wide collection of guidelines and naming conventions on how the transformation from PSD to (X)HTML and CSS needs to be performed. MoreCSS As a design-oriented JavaScript library, more CSS allows you to write code for creating pop-ups, tab menus, tooltips, advanced list styling, zebra tables, cross-browser opacity style and applying automatic hyphenation. CSS Menu Maker Creating cross-browser compatible custom CSS menus is made flexible and easy with the CSS Menu Maker tool. Whether you're interested in creating a drop-down menu, a vertical menu, an accordion, a flyout or any other kind of menu; CSS Menu Maker is the tool you can't afford to miss. CSS Frame Generator CSS Frame Generator is a tool which returns CSS in a line-by-line way so as to reflect the XHTML structure. To get started with using the CSS frame generator tool, all you need to do is simply put the XHTML code in the available text-box and one of the trained professionals at CSS Frame Generator would provide you the corresponding CSS frame for your XHTML code. CSS Redundancy Checker CSS Redundancy Checker is a tool which allows you to find all the CSS selectors which are no longer used by any of the HTML files and hence may be redundant. The sole aim of CSS Redundancy Checker tool is to keep all your CSS files compact, utmost relevant and accurate. Awesome Fontstacks Awesome Fontstacks is an impressive CSS tool which allows you to create bundles of free, beautifully matching web fonts. If you're looking for exploring innovative possibilities in the world of web typography, then Awesome Fontstacks is the tool you can't ignore for sure. Wufoo Serving as a remarkable online form building tool, Wufoo comes with a web-based HTML form builder that can be used for building eye-catchy XHTML and CSS-based forms. So, whether you're looking for creating online surveys, contact forms or invitations; Wufoo is the CSS tool you'll find handy. Clean CSS Clean CSS is a perfect online tool that makes the process of sorting and maintaining the order of selector properties easy and quick. Since selector ordering can easily alter the intended behavior, it is recommended to be careful while Clean CSS tool sorts your selectors. WordOff As a yet another impressive tool for cleaning up the HTML code, WordOff will remove all the unnecessary elements like s, s and s, empty spaces, style elements and attributes. Additionally, it will also allow you to get rid of all dead whitespace and other bits of code that tend to break the HTML page. CSS Compressor CSS Compressor is a CSS tool that allows you to save on important bandwidth while compressing your CSS. You are free to choose from three levels of CSS compression. I recommend choosing the “Normal” mode for compressing your CSS. CSS Hat If you're looking for a look that will enable you to convert your Photoshop layer styles into CSS3, then CSS Hat is a must-try. With this tool, you can simply select multiple layers and receive the CSS code for each layer along with separate selectors. Kotatsu As a simple HTML table generator, Kotatsu allows you to attach classes to cells within the same column instantly and easily. Htmldevelopertools Htmldevelopertools allows you to update your CSS files on the server within a browser window. While Htmldevelopertools is currently working under IIS + .NET 3.5, it can definitely turn as the greatest asset for designers and developers. CSS Text Wrapper With the CSS Text Wrapper tool, you can conveniently make your HTML text wrap in several shapes instead of just a simple rectangle. You can go ahead with wrapping the text around zig-zags, curves or whatever shape you want. Sky CSS Tool Serving as an incredible online CSS authoring tool, Sky CSS tool allows you to create CSS classes without the need for writing any lengthy code. You just require a JavaScript-compatible browser for making this tool work properly. Grid Designer 2.4 If creating a grid by specifying the number of columns, margins and gutters have become a stressful job, Grid Designer 2.
4 is the tool for you. In addition to specifying the typography within the tool, you can also avail the flexibility of bookmarking your grid and creating designs with spanning columns. WebPutty Available as an open-source tool, WebPutty allows you to edit the CSS online in addition to being able to preview everything that you're doing and further publishing your work with a single click. Replace CSS Colors- Editor This is a fabulous tool which allows you to change the entire color scheme of your website without touching even a single piece of CSS code. All you need to do is simply choose a local CSS file, replace the colors and download the new CSS file instantly. CSS Gradient Generator If you aren't comfortable with creating a gradient using Adobe Photoshop, then go ahead with using CSS Gradient Generator tool for the same. With this tool, you can even avail the flexibility of saving all your gradients using a unique link. Working with CSS become simple and exciting when you have the right tools available by your side. Here's hoping the ones featured above would allow you to get going with exploring your CSS journey in the best way. I am Savy Nacion, working as a technology specialist in Designs2HTML - HTML to Wordpress services providers company, based in Rochester, New York. With over 10 years of experience in the technology domain, I aim at bringing new and innovative technology solutions to the company to help it keep thriving in the industry. Updated On June 2019: Fixed Broken links and updated minor typos.
0 notes
Text
Paper's Please, a pixel-art game; an explanation - By RPG.
Papers Please is puzzle simulation game created by indie game developer Lucas Pope, initially in 2013.
In Papers Please, the character is tasked with role of immigration enforcement within the fictional dystopian Communist state of Arstotzka. The player must review character's passports and other important/relevant documentation, against an ever-growing list of harsh guidelines using a variety of tools and guides to support you.
Tasks included in the game are, as follows, checking for proper documentation (and detaining those without all proper documentation), rejecting and detaining those with falsified/forged documentation and balancing personal finances on the side.

Notes to make:
The game is set with a camera angle facing head-on, as if it was some kind of HUD system; this immediately would demand a different style of pixel art, and one that could potentially be more detailed than isometric pixel-art games. This also goes with the design of the "HUD" itself, and the design of characters and miscellaneous assets (like the stamps and notepad).
Further onto the aspect of character designs; they are all detailed and shaded to a high degree, where facial features (facial hair, blemishes, scares and even pores) and clothing are taken into account. Character's clothing, and any accessories they have on, do not take on a specific theme; but are almost indicative of styles seen around the 1990s in post-USSR states (inspired by early modernist fashion in the Soviet Union).
Outlining plays a major role in the designing of assets; anything from documentation, to tools and other objects share the same style of bordering. Saying this, take into example the outlining of the entry visa in the above image which is outlined in purple, and the entry permit which is outlined with the same purple. In terms of tool objects, like stamps and notepads, they are outlined in coordination with the colour palette for whatever surface they are closest to.
Level design is the same throughout, as it is styled in a "HUD"-style format; the same colour palette remains and the level doesn't change in appearance retaining its same dark-toned appearance.
youtube
The game's use of pixel art:
For assets, including documentation, there is a reasonable level of detail. An example of this could be the fact that text, inscriptions and other miniscule details are taken into consideration (things like the security features you would commonly see on passports and travel documents, for example, would also be featured in game).
The style of pixel-art can be both refined/detailed and simplistic; this is dependant on if the pixel-art in question is a character design, or level design. Assets tend to be more aligned with being more simplistic, and detailed; their "object" counterparts, and characters, tend to be more aligned to being much more detailed, with shading and outlining being present.
UI remains the same throughout the entirety of the game, through all levels and such. This is done in a simple HUD style, with a very minimal colour palette consisting of browns, greys and the shade of black.
RPG-7
0 notes
Text
Oh my God, do not get me started. I know enough about web development to know that all these over-designed graphics are a BITCH to work with when you have multiple screen sizes at play. Not just form factors, but also pixel densities. You can't just throw a graphic on a website anymore and expect it to look good. And frankly having to render an image in multiple resolutions, some of which may never be seen except by a select few, and which won't even look right outside certain spacial contexts. There's a few reason why this style dropped off, at least on websites, and there's a few good ones. But let's be honest, we could have figured it out. Engineering is just advanced problem solving.
We lost this beautiful aesthetic that has now been condemned to zeerust territory because Steve Jobs had a Vision, and when designers the world over weren't copying down his every word for their own personal edition of the Jefferson Bible, they were copying the other designers who were, which is how Windows 8 happened. iOS7 ushered in an era of flat minimalism. Gradients, drop shadows, cool skeumorphism (not just making a notepad app look like a notepad because reasons), all fed to the fire. Forgotten, banished, trampled underneath the feet of a giant who decided that now he was abandoning any pretense of realist similarities, EVERYTHING SHOULD BE FLAT. More multicoloured than ever at least, but flatter than a sheet of paper underneath an elephant's foot. And sadly his adoring copycats picked up on the minimalism and flat design, but none of the colour.
We as a society lost something. And the only ones who understand that WE WERE ROBBED are just growing older.

how come th1ngs looked way futurist1c bef0re than now.
2K notes
·
View notes
Text
Image Formats: What You Should Know For Your Website?
Have you spent hours crafting the perfect web design, only to find your pages loading sluggishly and your images looking less than stellar? It is no doubt a frustrating outcome, but fear not because the culprit might just be the image formats you’ve chosen.
To correct this mistake, you first need to know about various image formats for your web design. Later, from slow loading times to compromised image quality, we will explore the challenges that arise with each format.

So, grab a notepad and join us as we navigate the maze of image formats to ensure your web design shines bright and delivers an exceptional user experience.
Types of Image Formats
1. JPEG or JPG
JPEG, a widely embraced image file format, reigns supreme in the digital landscape, especially for photographs snapped by your trusty camera. Offering a staggering palette of 16,777,216 colours, it’s the go-to for preserving visual fidelity. This versatile format also boasts adjustable compression levels, making it a darling of web graphics.
However, it’s not without its quirks. While social platforms like Facebook and Instagram automatically convert uploads to JPEG, beware of its “lossy” nature—it sacrifices quality for smaller file sizes. Ideal for lifelike scenes and smooth colour transitions, JPEG falters with sharp-edged visuals like line drawings.
Yet, for web content like blogs and articles, JPEG’s compromise between quality and loading speed is unbeatable. Squarespace and Shopify swear by it for their products and pages, while Wix and Webflow advocate for its SEO-friendly attributes and browser compatibility.
2. PNG
PNG, renowned for its lossless compression, preserves image intricacies and colour contrasts flawlessly, making it the standout of graphic enthusiasts. Unlike JPEG, PNG excels in text clarity, making it a staple for infographics, banners, and screenshots. Its lossless compression ensures every pixel detail remains intact upon viewing, enhancing image quality and text legibility.
However, beware of bloated file sizes, especially with high-resolution images, which can sluggish website loading times. Yet, PNG offers versatility, allowing transparency adjustments and interlacing for faster development. Although lacking animation support, PNG’s extensibility opens doors for future innovations.
Usually, embraced for:
Decorative elements
High-quality images
Image optimisation
With universal browser support, PNG stands tall as the go-to solution for impeccable image quality without compromise.
3. SVG
SVG, or Scalable Vector Graphics, revolutionises web imagery with its markup language prowess, rendering two-dimensional masterpieces directly within browsers. Unlike raster formats, SVG employs XML text to define shapes and lines, enabling infinite scalability without sacrificing quality.
Ideal for:
Simple illustrations
Logos
Icons
Responsive web designs
While not suited for complex drawings or images, SVG’s small file sizes and lossless scaling make it a favourite among designers. Platforms like Editor X offer a plethora of vector assets, while Webflow and Wix Editor seamlessly integrate SVG into their design workflows.
However, with the lack of universal browser support, SVG may encounter quality limitations. Nevertheless, its unmatched scalability and versatility cement SVG’s status as the go-to solution for dynamic, responsive web design.
4. GIF
GIF, a staple in web culture, offers lossless compression, preserving image quality while limiting colour to 256 shades — unsuitable for digital photos due to their colour constraints. GIFs find their niche in website buttons and banners, where limited colours suffice.
Despite graininess in photos, GIFs excel in:
Quick loading times
Animation capabilities
Enhancing user engagement
However, once encoded, GIFs are immutable, requiring source data for edits. While ideal for training animations, their heavy file sizes can impede website loading, cautioning against overuse.
5. WebP
WebP, a state-of-the-art image format, revolutionises web imagery with superior compression techniques, catering to both lossless and lossy needs. It significantly reduces file sizes compared to PNGs and JPEGs, ensuring faster web speeds without compromising quality.
WebP’s adoption by platforms like WIX, Editor X, and Shopify underscores its efficacy in minimising file sizes while maintaining image integrity. However, its limited browser support, confined to the latest versions of Chrome and Firefox, presents a drawback.
In essence, WebP presents a compelling solution for web optimisation, delivering smaller yet equally or even better quality images, albeit with browser compatibility constraints.
6. AVIF
Lastly, AVIF is an advanced image format that optimises image sizes while preserving quality, akin to its predecessors like WebP and JPEG-XR. Its support for high-dynamic-range imaging and full-resolution 10- and 12-bit colour ensures images are significantly smaller, up to ten times, compared to other formats.
Backed by tech giants like Google and Amazon, AVIF offers:
Optimal compression
Transparency
Modern features without royalties
While it promises to replace outdated formats like JPEG, its limited adoption poses challenges. Each image format, including AVIF, has unique advantages and drawbacks, necessitating careful consideration before implementation. Despite its potential, widespread use of AVIF remains limited.
Final Word:
In conclusion, the diverse landscape of image formats offers a spectrum of choices, each with its own strengths and limitations. From the pioneering WebP to the cutting-edge AVIF, web design experts must weigh the trade-offs to optimise their web content effectively, ensuring a seamless user experience across platforms.
If you need a reliable professional to entrust your website design in Adelaide, you can check out Make My Website — an excellent and rising star in the industry. It has worked with different businesses, upscaling their web presence. So, feel free to touch base with MMW.
#seo geelong#seo melbourne#web design truganina#web design melbourne#web design perth#web design geelong
0 notes
Text

Create and upload your image to Google Drive.
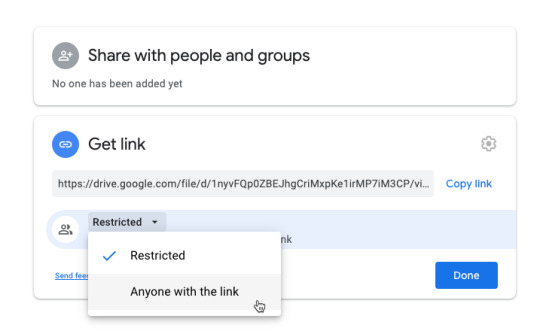
Create and upload your image to Google Drive.
Make sure the image is in the right format. It should be a JPEG or PNG file, and its dimensions should be at least 1000 pixels wide by 1000 pixels high (or larger).
Make sure that you have the right dimensions for your images before you upload them: they should be between 1000px and 4000px on the longest side of their frame, but if you’re using them as part of an interactive project like a quiz or game then it may make sense for these rules not apply since those types of projects often require smaller sizes so users can see everything clearly when playing with them!
Go to the file in Google Drive.
To get to the file in Google Drive, go to the folder where it’s saved and click on its name. If you can’t find it there, make sure that you’ve added all of your files from Google Drive before searching for them or try searching for them by their titles or descriptions instead of just their names.
If none of these steps helps you find your image file in Google Drive, contact us so we can help!
Click the three dots on the top right of the file, then select “Get shareable link.”
Click the three dots on the top right of the file, then select “Get shareable link.”
Copy the URL of the image and paste it into your website editor.
Copy the URL of the image and paste it into your website editor.
Once you’ve copied the URL of the image, you’ll want to paste it into your website editor.
You may need to do this multiple times, depending on how many images are in your Google Drive folder and whether or not they have been uploaded as “public.” If an image was uploaded with its privacy settings set at “private,” then it won’t appear when visiting that folder on Drive (unless you’ve granted yourself permission).
If you want people visiting your site from outside of Google Drive–or if there’s no way for them to view these files without opening them directly from their computers–you can also use their URLs as links that open images in new tabs or windows when clicked upon.
You can embed images in Google Drive through a link that embeds HTML and CSS
You can embed images in Google Drive through a link that embeds HTML and CSS. This method will work if you have the image file on your computer, or if you have uploaded it to Google Drive.
The first step is to create an image URL by going to the file’s page on Google Drive: https://drive.google.com/file/d/[PATH]/. Then replace [PATH] with the path of your image (for example: /path/to/image). You may need to change this path depending on how many folders deep your file is located within Google Drive’s folder structure; keep changing backslashes until they do not appear in front of each character after “d/” in your URL string anymore–this means that all folders should be collapsed into one level!
Once this is done correctly, copy-paste this new long string into any text editor like Notepad++ or Sublime Text 2 (or whatever else floats your boat) and change everything except “https://lh4a2ngt35w8fvght5gtj…” into boldface font so it stands out from regular text easily when we paste it later into our HTML code editor window which we’ll explain next step below 🙂
Now, you can embed images in Google Drive through a link that embeds HTML and CSS. This is great if you want to include an image on your website without uploading it directly to the site or using FTP software like FileZilla.
Certainly! Here’s a step-by-step guide to help you embed images from Google Drive on your website:
Step 1: Upload your image to Google Drive
Log in to your Google Drive account.
Click on the “New” button in the top left corner.
Select “File upload” from the dropdown menu.
Select the image file from your computer that you want to embed on your website.
Wait for the file to upload to Google Drive.
Visit for more: How to Embed Images from Google Drive on your Website? - ITMlab
1 note
·
View note
Text
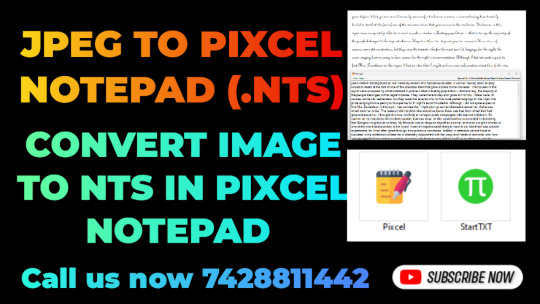
1. Use our Image to Pixel Notepad Converter and turn your photos into pixel based text documents! Transform any image in just a few clicks with IntelliTechData's easy-to-use tool.
2. Stuck trying to convert an image? Let us help you out! With IntelliTechData, quickly translate any photo of yours into a notepad document without hassle - no extra coding needed!
3. Tired of complex conversion processes? Say goodbye to them now – simply use the advanced software from IntelliTechData for fast uploading and editing using its intuitive user interface — it couldn’t be easier than that!
4. Turn images into pixelated text effortlessly with the revolutionary platform offered byIntelliTechData today—the perfect solution for all your data needs powered by robust AI technology behind it too !
5 . Need an efficient way to transfer images over as notes ? Look no further because at Intellitechdata we provide swift yet secure services tailored specifically towards helping you achieve exactly this goal everytime
1. Have you ever wanted to convert an image into a pixcel notepad? Check out our guide on how this can be done with ease! #techsavvy #professionalresults
2. Did you know that converting images to pixel notepads is easy and achievable? Get amazing results by following our simple steps! Go ahead, give it a try now. #beTechReady
3. The perfect solution for all your tech needs - Learn the best way of converting images to pixel Notepads right here in no time at all! Don't wait; act fast before it's too late.#advantageous4you
4 If you are looking for ways on how to turn images into pixels Notepads, look no further – We have got what it takes for guaranteed success every single time!#staysmartandachievemore
5 Need help transforming an image traceable language document into Pixcel Notepad format? Try us today where we provide straightforward instructions and step-by-step tips so you get maximum benefit from your efforts easily !#getthemostoutofyourtime
1. Stop wasting time with paper and pen! Get into the digital world with Intellitech Data-Services; our Image to Pixcel Notepad is your key to success! #DataSolutions
2. Let technology do all the work for you - grab a copy of Intellitech's image to pixel notepad today, and take your organization up on level! #DigitalRevolution
3. No more tedious manual labor required: try out Intellitec Data-Service's latest innovation – their revolutionary image to pixcel notepad now! #TechSavvy
4. Leave that outdated paperwork behind - experience state-of-the art data solutions in no time at all with INTELLITECH DATA SERVICES' innovative new product: Image To Pixcel Notepad #CalculateSmarter
5. Say goodbye spiral notebooks–step right into modernity via INTELLITECH DATA SERVICES one stop shop solution ‘ImageToPixcelNotepad’#UpGradeNow
1. Get your pictures converted to text with accuracy and efficiency! INTELLITECH DATA SERVICES offers high quality Image to Pixcel Notepad Conversion services with fast turnaround times. <br />
2. Let the professionals at INTELLITCH DATA SERVICES assist you in seamlessly converting images into a pixel notepad format without any hassle or extra costs! <br />
3. Have confidence that all of your image needs will be met precisely by using INTELLTECH DATA SERVICE's superior image-to-text conversion service today! <br>
4. With over ten years of experience, rely on INTELLITECH DATTA SERVCIES for timely and precise conversions from picture to readable pixels every time ! <br>
5 . Save yourself headaches & money by trusting INTELLITECH Data Services' extensive knowledge when it comes turning photos into pixcell notepads quickly & accurately each time <br>
1 note
·
View note
Text
why would you learn photoshop which costs $$$ when you can convert your images to TIFF format and edit them for FREE in notepad. one pixel at a time


big adobe doesn't want you to know this one simple trick
Everyone keeps talking about how the youth these days know nothing about computers but the only teenagers I come into contact with are the sort of people who save up all their own money to build their own pc and learn how to code in their freetime like for fun so I’m starting to suspect that my experience of feeling technologically stupid around teenagers may not be universal
#re:convoluted solutions to simple tech problems#for legal purposes this is a joke#but if you do use mkdir to create folders on your computer you are still valid#i'm just not opening the console to do only that
958 notes
·
View notes
Text
ebay masterpost
*Charity Update! 11/30/23* Thanks to being in a more comfortable financial place, I've re-activated my automatic charity donations on all my listings. 10% of any item's final sale price will be donated to Doctors Without Borders. (donation receipt available here)
This is EVERYTHING I have listed for sale divided up by various categories, with photos and links! I will update this main post as I add and subtract things!
Quick rundown of franchises featured so you know if you wanna bother clicking the readmore: Awful Hospital, Beetlejuice, BlazBlue, Chucky, Danganronpa, Don't Hug Me I'm Scared, Inuyasha, The Melancholy of Haruhi Suzumiya, Neopets, Nightmare Before Christmas, Osomatsu-San, Pokemon, Super Mario Bros, plus additional non-franchise related clothes/accessories/misc
Or click here to simply go to all my listings.
Awful Hospital

Awful Hospital Enamel Pins + Acrylic Charm Lot
Awful Hospital Throw Pillow Case
Beetlejuice
WB Horror Funko Hot Topic Exclusive Beetlejuice 23" Sandworm Plush
BlazBlue
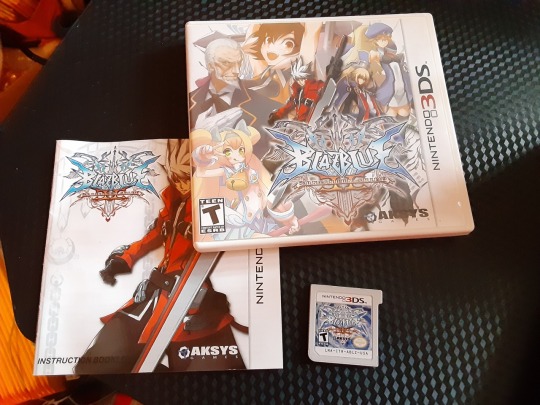
BlazBlue: Continuum Shift II (Nintendo 3DS, 2011, English) - Tested & Working
Chucky

Licensed Chucky Tarot Card Spencer's T-Shirt - Unisex Large (used)
Danganronpa


Danganronpa Sonia Nevermind Pixel Rubber Keychain
Danganronpa Yasuhiro Hagakure Pixel Rubber Keychain
Danganronpa Mikan Tsumiki FuRyu Figure - New in Packaging
Don't Huge Me I'm Scared
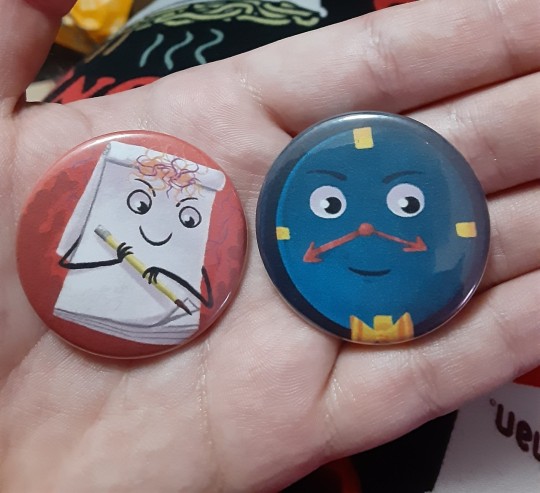
Set of DHMIS Tony and Notepad 1.25" Pinback Buttons
Inuyasha

Plastic Inuyasha Keychain Licensed 2006
The Melancholy of Haruhi Suzumiya

The Melancholy of Haruhi Suzumiya - Mikuru Asahina Maid Outfit Figure Keychain
Neopets

Neopets Bruce Burger King Plush Toys 2008 Orange & Green
Nightmare Before Christmas

Nightmare Before Christmas Jack Skellington Ruffle Jacket Hot Topic - used Large
Osomatsu-San


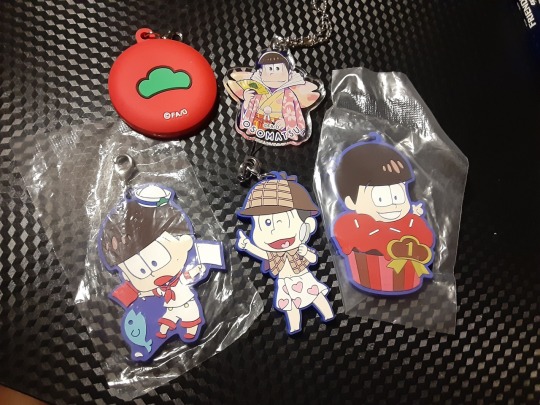
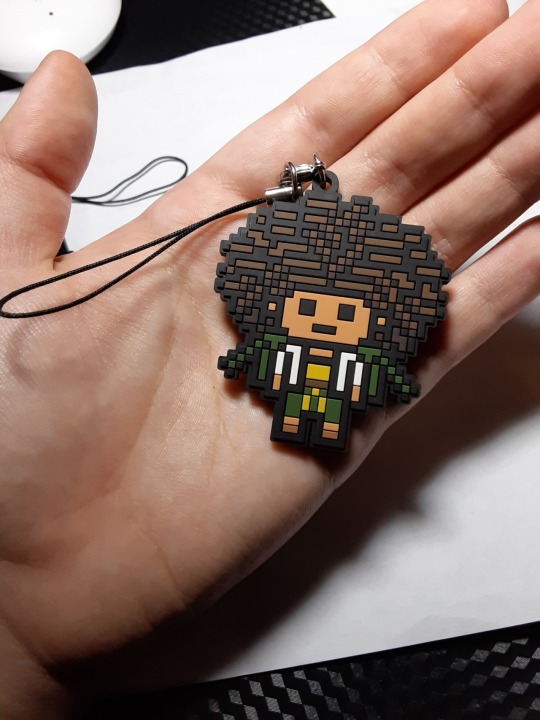
Osomatsu-San Todomatsu Various Keychains Lot
Osomatsu-San Various Characters Keychains + Pin Lot
Osomatsu-San Osomatsu Various Keychains Lot
Pokemon


Pokemon Charizard 2013 Pokemon Center Plush (read desc)
Weavile Pokemon Center Plush Toy 2005
Super Mario Bros.
Licensed Nintendo Kellytoy 9" Mario Plush 2004
& Miscellaneous (click links for photos; only 30 images allowed per tumblr post)
N/a
#for sale#ebay#ebay masterpost#seth speaks#ok to rb#not bothering tagging everything though (pensive emoji)
52 notes
·
View notes
Text
Custom Regions in SC4 for TS2: Part 1
As promised, I wanted to share the results of my experimenting with creating a custom Region in SC4 specifically with more customizable maps for TS2 in mind. I’ll explain the method of creating the region and some tips for generating your maps.
I will say up front that, unfortunately, SC4 has not been great for me at interpreting a height map generated straight from a 3D program. I will share what ultimately worked for me but maybe others will find new methods with further experimentation.
This isn’t really a procedure for beginners. You’ll need some basic understanding of how to use various graphic programs in order to create a map. I don’t want to discourage anyone though, so go ahead and read on if interested!
PART 2
PART 3
WHAT YOU’LL NEED:
SimCity 4
Notepad (the program)
Microsoft Paint (or any program that will allow you to create accurate pixel grids)
A 3D Modeling software program (optional)
Photoshop or the equivalent (Gimp, Krita, etc.)
SC4 Terraformer
HoodPlanner (optional)
STEP 1: CREATE A CUSTOM REGION
In order to create a custom neighborhood map for TS2, you need SC4. And, specifically, you need to use a Small City Map within a SC4 Region, as no other size will work for import into TS2.
SC4 Players have been using Greyscale Height Maps to generate custom Regions since almost the dawn of the game, and it’s a great tool! But for TS2 map-makers it hasn’t been a great option because the map needs to be applied in Region View, to the entire Region, and cannot be applied to a Small Map on an individual basis.
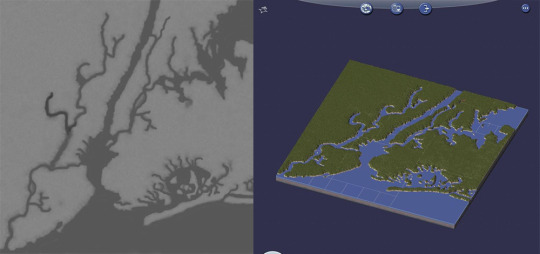
But I’ve found a workaround! The first thing you’ll need to do is go into your Documents\SimCity 4\Regions folder and copy and paste one of the existing folders to create a new one.
Rename this folder to whatever you like, I chose “Test”.
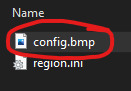
Open the new folder you’ve made and you should see two files: config.bmp and region.ini
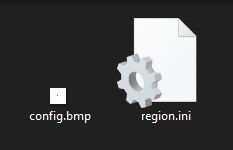
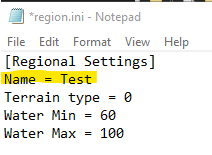
You will need to modify both of these. First, open “region.ini” in Notepad and change the region name to match the name of your folder, “Test”
Save and make sure that it saves using the same filename and extension; region.ini
Next we’ll make a new config.bmp image. This is the image that generates the layout of every Region. You can customize it by drawing your own pixel map and rearranging the layout.
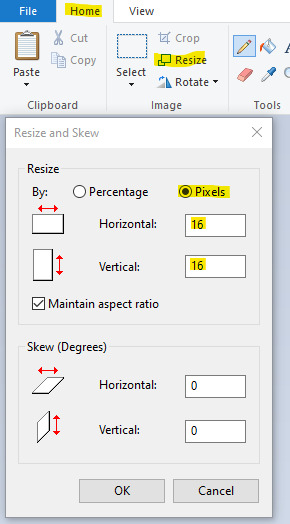
Open up Windows Paint and click the “Home” button. You will be creating a new grid that is 16 pixels by 16 pixels. Click “Resize”, make sure that the “Pixels” radio button is selected and then enter 16 for both the horizontal and vertical values.
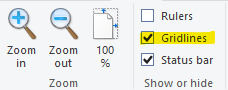
Make sure that your Gridlines are showing by turning them on in the “View” menu.
Use the “Zoom” tool to zoom as far in as you can go (I think it’s 800%)
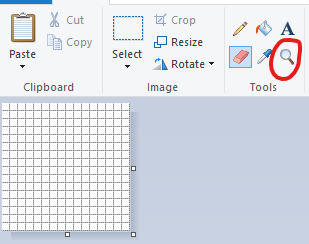
And the above is what you should have on your screen! Next, we’ll create our custom region.
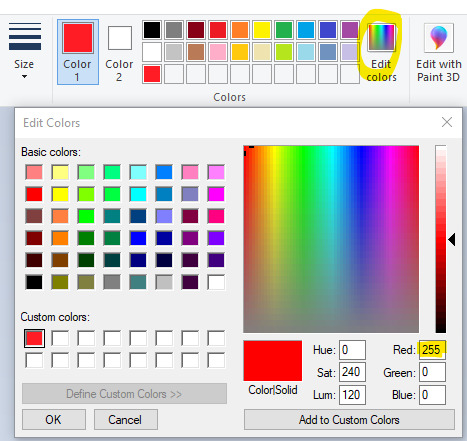
The three colors that represent regions in SC4 are Red, Green and Blue. Since we only need to worry about making a Small region (as that is the only size that works with TS2) then we only need to use Red which is the color for a Small.
It’s important to get the color exact, so on the “Home” menu, click on “Edit Colors” and type 255 into the Red Value.
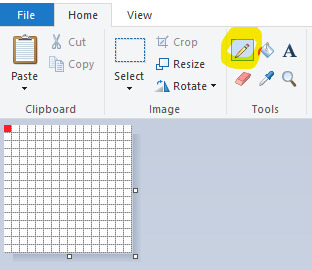
Once you’ve made this color, go ahead and select the Pencil tool and fill in just one pixel on the grid with the Red color. I tried a couple of different positions when doing this and found that it works best when it’s on a corner, placing the pixel in the center of the grid will not work.
Once you’ve done that, hurrah! You’ve made your Small Region!
Save this file into your Test folder in Documents\SimCity 4\Regions and overwrite the config.bmp file that is already in there.
Now, open up SC4 and click on “Load Region” from the Main Screen.
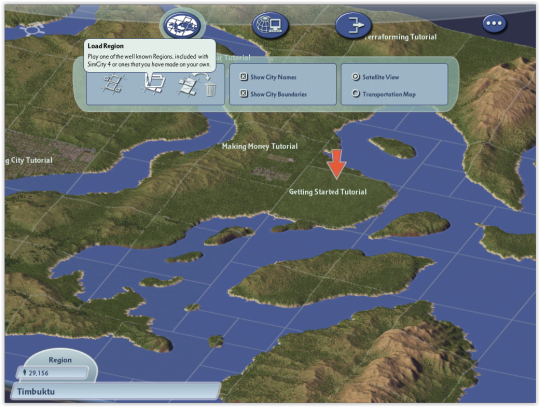
Scroll down to find the “Test” folder you made. Select it and click “Load Region”
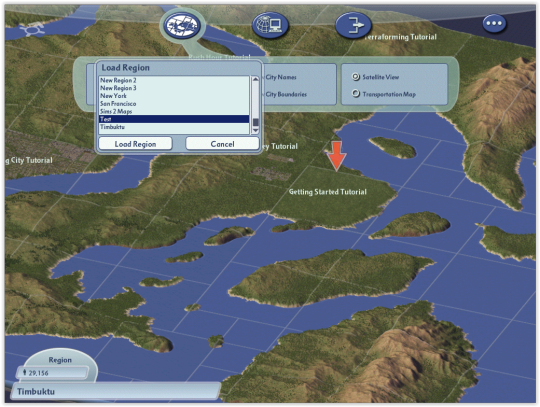
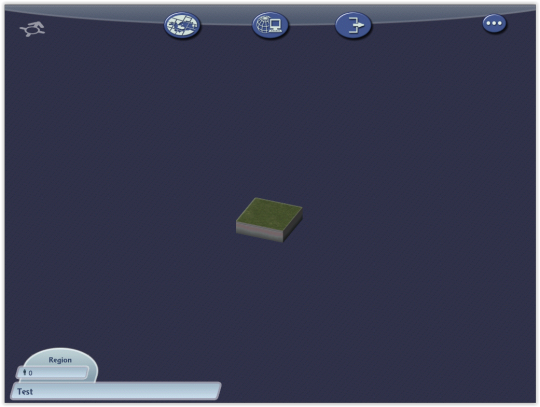
And there it is! Our baby map, the correct size for TS2, is now a Region all on its own! Now we are free to try different things to create maps that we have a bit more control over.
70 notes
·
View notes
Text
TS3: Eye Shader Tweaks

This mod requires the latest version of Lazy Duchess' Pixel Shader Modding Framework to work!
I've always liked the idea behind The Sims 3's unique eye effects, but they often felt rather jarring to look at and could ruin an otherwise beautiful screenshot, so I tried to make them a little bit prettier.
This tiny mod improves the look of Sims' eyes, both in Live Mode and CAS, by softening the catchlights and occult eye glow, as well as greatly reducing unsightly shadows.
Shader modding is admittedly very foreign to me, as this was just a work of trial and error, but I think the result is decent and so I’m happy to share it!
More info, install instructions and download under the cut!
Compatibility & Known Issues
Compatible with any default replacement eye textures you may have.
Compatible with Lazy Duchess’ Shader Tweaks; my mod includes Lazy's pet catchlight fix, so if you already have Shader Tweaks you can replace the relevant files with mine.
Compatible with my own re:Cerberus eye mesh replacements, as well as Mahamudo’s aWT Eyeball Mesh and Buckley’s conversion for Children and Toddlers. For the latter two, the catchlights will only be visible if you download the SimEyes shader versions.
The occult eye glow won't look perfect with eye textures where the iris is smaller than EA's default. This is by EA's design; unfortunately I haven't yet found a satisfying way to solve this issue.
Install Instructions
Download and install the latest version of Lazy Duchess’ Shader Framework (super important!!)
DELETE the files SimEyes.msasm, SimEyesLive.msasm and SimEyesLive2.msasm, SimEyesLive3.msasm and SimEyesLive4.msasm if they are in your shader_replace folder.
Copy the contents of the shader_replace folder in simbouquet_EyeShaderTweak.zip to your own shader_replace folder in Game/Bin. Allow it to replace any files it needs to, including aliases.cfg.
You’re done!
Download: SFS / Patreon
28/11/2024: Fixed CAS eye shaders; catchlights now match between human, occult and alien Sims.
21/11/2024: Reduced outdoor shadows and made minor adjustments to the occult eye glow.
12/06/2023: Added support for occult eye glow; changed file format from .msasm to .hlsl. Delete any .msasm files beginning with SimEyes prior to installing this version to avoid issues.
26/09/2021: Initial release.
Credits & Thanks
My re:Cerberus eye mesh and texture replacements, seen in the preview images.
Adobe Photoshop: Creating the preview image.
Notepad++ & WinMerge: Comparing and editing shader files.
Thank you to @justmiha97 for letting me peek into his own eye shader mod to incorporate some of his edits into my own!
Thank you to Lazy Duchess for her contributions to Sims modding in general, and particularly for the Shader Modding Framework which makes mods like this possible.
531 notes
·
View notes
Text
Doveclan, A Clan Gen Adventure
I recently found out about this pixel game that feels relatively similar to how I sometimes play clans using notepads and randomizers. The game is called Clan Generator, or Clan Gen. The original was made by @just-some-cat, and the version I will be playing is from https://sablesteel.itch.io/clan-gen-fan-edit. The images used in my Clan Gen posts will be using this game's sprites. Unless stated otherwise.
To start, I have decided to name the clan I'll be playing with Doveclan. I never named a clan after this blog's namesake before, so this seemed like a good place to try.
Welcome to my new filler series! Doveclan is here to provide extra content and give me a buffer to get A Forest of Tales and Warriors Destiny content prepared.
Hope you all enjoy!
30 notes
·
View notes